Hello all,
Its been a while since Ive written anything on here so I thought I would do a short update of what is going on with my project.
I have narrowed my scope down to 5 areas of investigation to make more effective use of my time: Timeline analysis, connected USB devices, email investigation, internet history artifacts, and changes made to the file structure when programs are installed. It is not a large list but I think it hits a lot of the major areas of forensics investigation.
I created a VM using vmware workstation and created 4 unique profiles, giving them specific interests and programs to use. I modeled it on a small family and generated around 13 pages of documentation including websites visited, programs downloaded, manipulating files, emails both from thunderbird and webmail, and transferring files. I will release the documentation soon along with the virtual machine and the images I created from it. My goal is to have to create a VM that can be used for testing tools for verification purposes. It is a well documented file and if the tool results are released as well they can be compared to other tests and see if the tools are working correctly.
My other side of the project is explaining how testing the tools is necessary when performing an investigation, especially if the results are going to be presented in court. I am using papers written by Cory Altheide and Brian Carrier as resources and interviewing forensics investigators on their views of both closed and open source products and the ways that they verify the tools.
If anyone would like a copy of my work or has any questions about what I am doing please just leave a message or email me. I am happy to help anyone that I can.
~Josh
Wednesday, November 7, 2012
Friday, September 7, 2012
Capsone Project
As I near the end of my days at Champlain College I am being tasked with a large project that every senior at this school must face. their final project which is Capstone. This project serves to combine everything we have learned from our CORE classes and major classes to produce a unique project that is different depending on the major. Since I am in Computer and Digital Forensics (the best major ever) I have the opportunity to do a piece of major research on a topic of my choice. With the help of Jon Rajewski and Mike Wilkinson I have decided to work on a comparison of the open-source forensics operating system SIFT against proprietary software such as EnCase and FTK.
I will be conducting a variety of tests covering different areas of forensics including:
attached USB device
encrypted drives
hidden folders
file search
hash search
email search
password look up
Timeline
corrupted files
Documentation/Report generation
cookies
Internet files/history
downloaded files
mobile
messenger chat
P2P information
In addition to the forensics information that I will be posting I will have posts relating to the capstone class which include insights into why I have chosen this project as well as what I hope to achieve. The class is very ethically heavy and deals with many topics that make us reflect on why we do things as well as where we want to be. I will be using this blog to help document my work and share everything I learn with the forensics professionals.
I look forward to working on this project and hope that people will comment on the work if they have suggestions or comments for me.
Tuesday, July 31, 2012
Autopsy 3 beta
Autopsy 3.0
What is Autopsy
Autopsy is an open source forensics tool that can be
compared to FTK or EnCase and is able to assist investigators when working on
cases. It is created by Brian Carrier, the same person who made the Sleuth Kit
which Autopsy is based off of.
What is New in Version 3
Autopsy 3 has been completely rewritten from version 2 and
includes many new tools and options that previous versions did not have.
Autopsy 2 was a browser based tool, which meant that it ran through a web browser,
specifically Mozilla’s Firefox. Version 3 has changed to be a self-reliant
program that does not need to be run through Firefox and has the look and feel
of a traditional forensic program. Autopsy 3 also has included a new function
called ingest modules that analyze data, list the information in tree format,
and allow searches based on: keywords, hashes, and recent activity.
Investigators who have used older versions of Autopsy will notice the
restructuring of the program and the addition of the single navigation tree
that creates a cleaner and streamlined look.
Where to Get Autopsy 3.0
Autopsy 3.0 can be acquired from different sources, but the
most reliable source is to go to the website for the Sleuth Kit (http://www.sleuthkit.org) and select the
projects tab at the top:
Next navigate to the Autopsy page by selecting Autopsy on
the side bar.

Select Download followed by “Download Beta Version 3.0.0b4
(July 3, 2012), or the newest release available of Version 3.

You will be taken to the Sourceforge site for the Autopsy
browser and given a list of versions to download. Select the newest version
available to download and it will automatically start after a five second
delay. After Autopsy has been downloaded,
run the installer and then Autopsy will be ready for use.
How to Start a Case
Starting a case in Autopsy 3 is simple and easy to learn for
anyone ranging from forensics investigators all the way to curious users or IT
support. Upon starting Autopsy 3, a window will open with three selections to
make: create a new case, open existing case, or to open a recent case.

For this tutorial we will select the “Create New Case”
option and be directed to a new window that will have information to fill in,
and for this tutorial we will be naming the case “Test.”

After the information has been filled in select the next
button. The next window will allow the investigator to fill in the case number
and examiner name. This is for the purpose of creating better documentation and
logging. After the information is filled in select the finish button to
continue.

The next step in the investigation will be to add an image
file to the case. The image file can be chosen from a wide variety of formats
including: img, dd, 001, aa, and e01. Use the browse button to find the image
that is desired to work with and select add. Options to choose the timezone of
where the image came from as well as to ignore orphan files in FAT file systems
are available to be selected based on the investigators preference and
situation. For this tutorial I am using the Forensics World C.S.I. Challenge
sample image called precious.img. If you would like to follow along with the
tutorial and use the same image for practice you can obtain the image from: (http://myweb.cwpost.liu.edu/cmalinow/csi/tools.html).

After selecting the next button the image will be added to
the case and the next button should be selected again if there are no errors.
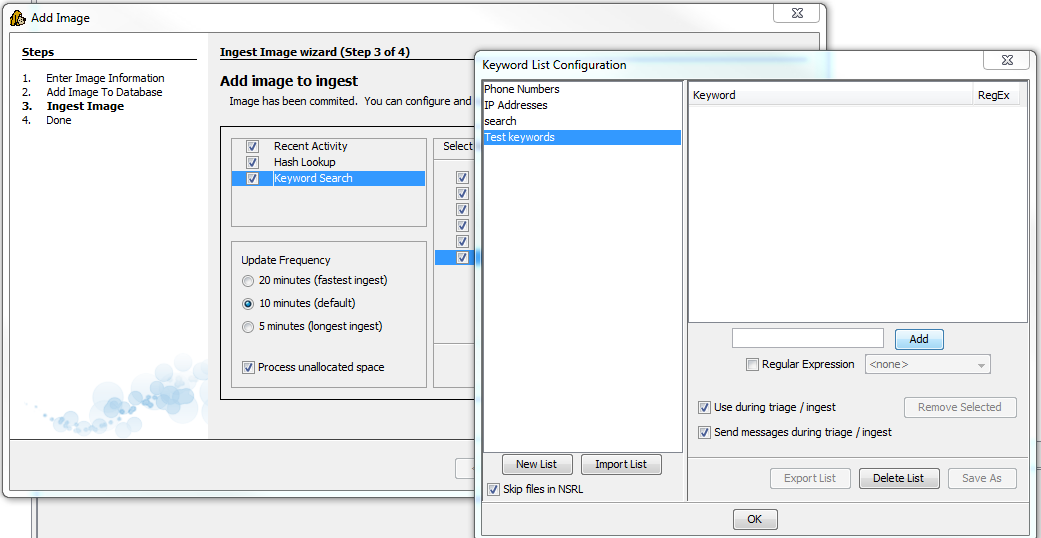
The following window will bring the investigator to the
Ingest wizard panel, which is one of the new features offered in Autopsy. There
are three options in the first box: Recent Activity, Hash lookup, and Keyword
Searches.

By selecting any of the options advanced settings can be set
to increase the capabilities of the search. Under the Hash Lookup option there
is the advanced option to add databases of known hashes.
Under the Keyword Search option are many different lists
that can be used to search for information. By default, Phone Numbers, IP
Addresses, Email Addresses, and URL’s are available. Select the Advanced button
and a Keyword List Configuration window will open. In this new window select
New List and type the name that is desired for the list. This makes it easier
to search by subject matter or other organizational methods. For now the list
Test keywords will be used to create a list. In the adjacent pane there is a
blank section with a word bar and an Add button next to it. Type the keyword
desired (case sensitive) and select Add to add the word to the list. There is
also the option to select Regular Expression.
This allows the investigator to further narrow the field to search in by
selecting what the keyword is that is being searched for including: passwords,
emails, text file name, domains, and many more options.
For this tutorial the keywords that are used are chosen
because of the content in the image that is being used so the best results will
be found.

After finishing the keyword parameters the screen will be
laid out for the user.

Notice how everything is laid out in “tree” format much like
in the popular programs such as EnCase.
This is one of the new features in 3.0 and is helpful as it allows the
investigator to organize much easier. After the image is indexed the tree will
be populated by the file system, extracted content, keyword searches, and the
hash list (if any were used).
One of the first things the investigator should do is to
generate a report. This will allow the investigator to have an idea of what
type of information is available and what to expect. The report can be generated
in three formats: Excel, XML, and HTML. It also has the ability to select what
information to display with choices that can be seen in the image below.

With the report on hand the investigator will have an idea
of what to expect as well as a list of programs that are installed on the
machine. This will allow the investigator to look for specific files or keep an
eye out for certain markers. For example, if TrueCrypt is installed on the
computer then the investigator will know that there is a chance of a TrueCrypt
volume on the computer and can look for it. Another example of using reports is
to look at the attached device list and compare that to removable media that
was also seized. This can help investigators gather all the evidence they need
to perform a complete investigation.

Looking at the tree, the top selection is titled “Images”
this is where the acquired image is located and the bulk of the investigation,
will take place. If the Images tab is expanded the investigator will see each
image that was added to the investigation. By expanding an images tab the
volumes of the image will be seen including the file system and unallocated
space. Expanding the tab that contains the Operating System will give the
investigator a look at the root directory and the tree that contains most of
the relevant information. This is the same as if the investigator would open
the default drive when browsing through a system.

Below the Images tab is the “Views” tab that will allow the
investigator to separate the information in the image into different categories
such as by file types and by recent documents. The file type can be broken down
into: images, video, audio, and documents which includes the major text
formats. Another section in the Views tab is a new feature in Autopsy 3, the
Recent Files tab. This tab allows the investigator to get a rough outline of
what happened in the last 6 days of use by the suspect. The results include
registry files, documents opened, and programs run.

The next tab that is seen is the Results tab, this is a new
feature that displays all the information from the ingest process. This uses
the program BEViewer to look for certain information inside of the data and
separate it into sections that make it easier to search for specific data
instead of going through all of the information manually. Although this
simplifies the investigation process, it does not mean that this is all of the
information that is able to be gained through an investigation.
There are 4 main categories when separating the Results tab:
Extracted Content, Keyword Hits, Hashset Hits, and E-mail Messages. Each of
these sections has subsections that allow for more specific information
divisions. In the Extracted Content tab there are sections for: Bookmarks,
Cookies, Web History, Downloads, Recent Documents, Installed Programs, and
Device Attached.
The bookmarks tab contains information on bookmarks created in
the internet browsers so the investigator can see a list of sites that the
suspect frequented enough to create a bookmark for. The cookies tab will allow
investigators to see a general idea of where the suspect has been recently by
looking through the cookies and seeing which sites have cookies stored on the
computer. The Web history tab searches for .dat files and lists them to show
another list of internet usage through web browsers. The download tab allows
for the search for any downloads on the suspect computer. Recent documents will
show documents that were opened on the machine recently by looking at their
metadata and deciding how long ago a document was opened. The installed
programs tab will give the investigator a list of programs that are currently
installed on the machine. The tab for attached devices is obtained by looking
through the registry files and determining which hardware devices have been
plugged into the system at one point or another.
Under the keyword hits tab the investigator will see all the
options that were selected in the ingest index window when starting the case.
The information includes: phone numbers, URLs, email addresses, search words by
the user, IP addresses, and regular expression searches.
The tab for hashset hits only has results if a list library
was added to the case before hand to run matches against. If the investigators
had a hash library of known child pornography or pirated material they could
run all the information on the computer against the library and all of the
results would be placed in the hashset hits tab.
The e-mail message tab will place any emails from a desktop
client in the tab for review. The supported programs are Microsoft Outlook and
Mozilla Thunderbird as of now but more are scheduled for support in the future.

Wednesday, June 20, 2012
Linux Forensics and Autopsy
I am currently researching and writing a report on Linux forensics investigation techniques and tools. I have had a infatuation with Linux for a few years now and am glad that I can finally merge my major with a hobby. For this report I am researching multiple open source forensics tools that would help in investigations and TSK (The Sleuth Kit) was one of the major highlights of my research. One of the key components of TSK is the Autopsy forensics browser, and as they just released their beta for 3.0 I decided that in addition to my basic overview for the report I would also do a review of the Autopsy beta. I hope to have an outline and basic review up in the next few days so check in soon to see the updates.
Thursday, June 14, 2012
Greetings
Welcome everyone to my blog for computer forensics and related topics. I am currently a student at Champlain College pursuing a BA in computer forensics and work as a forensics intern at the Leahy Center for Digital Investigations in Burlington VT.
The goal for this blog is to provide information relevant to the the fields of computer forensics, computer security, networking, and Linux. I am very interested in many fields of computers and am hoping to pass on some of that interest on to a wider audience.
My hope is to reach out to those in computer related industries and inspire them to learn new topics in and outside their field.
Subscribe to:
Comments (Atom)